
Investing in a robot mop may seem like a luxurious purchase, especially if you’ve already invested in a robot vacuum. Robovacs are great if your home has plenty of throw rugs or carpets. But if it’s mainly made of tiles or hardwood flooring, robot mops are worth considering.
When it comes to robot mops, it doesn’t get any better than the iRobot Braava Jet m6. This smart cleaning tool can offer wet mopping and dry sweeping. With its long battery life, it can easily cover as much as 1,000 square feet of surface in one go, making it great for larger homes and apartments.
The Braava Jet M6 is not shy in terms of features. It can learn the most efficient route for cleaning your home thanks to its smart mapping technology. It can get deep into corners and along edges and once it detects rugs, it will avoid them and go around them instead. Along with these, you can schedule cleaning sessions, as well as pair the robot with other Roomba vacuums compatible with it.

How Much Does The iRobot Braava Jet M6 Cost?
There is no doubt that this iRobot is quite impressive. However, at just under $500 in most major retailers, the Braava Jet M6 is more expensive than others. Still, when you think of what you’re getting, it is indeed a good deal.
Aside from the robot itself and its docking station, you’ll also get 4 disposable cleaning pads, two for dry cleaning and 2 for wet cleaning. What’s more, the box also comes with a reusable wet cleaning pad, as well as a bottle of iRobot’s cleaning solution specifically made for hard floors. The cleaning solution works with other models of iRobot Braava Jet and you are not required to use it with the mopping function.
If you have a limited budget for the M6, check out this mopping robot/vacuums top-list 2021 by Stephen A. Hancock to find something suitable with it.
Design
iRobot equipped the Braava Jet M6 with premium design elements similar to that of the Roomba S9+. But instead of the gold and black color combination of the S9+, the color scheme of Braava Jet M6 is matte white and silver.
Front and top parts
The silver disc center of the 10.6-inch square robot mop hides its removable water reservoir. Meanwhile, its large bumper at the front contains a button for ejecting the pad and its spray nozzle. Moreover, there’s a grip handle sitting just behind the front bumper’s recess, cleverly concealing it. On this handle, you will find the buttons for clean, spot clean, and home.
Bottom part
Placed underside the mopping robot are multiple sensors, a couple of rubber wheels, as well as its reader and pad holder. The pads of this iRobot model are proprietary for every cleaning function that are not only particular to the brand. Nonetheless, they are specific to the Braava Jet M6 and replacements are available. You can get the disposable pads in a set of 7 while the reusable and washable ones are available in packs of two.
Water tank
A lot of thought comes into the design of this Braava Jet model, notably on its water tank. Unlike the water tank of the Braava Jet 240, you don’t need to lift out the 15-ounce tank of the M6. Since the bottom of the tank is flat, it will sit safely as you add the cleaning solution or water. Although may seem like not a big deal, it does make a difference.
Docking station
The dock of this iRobot is white with an infrared sensor on its top and a drip tray that attaches to it. Once your robot docks, the wheel indentations and guides of the docking station will help keep it in place. Keep in mind that the drip tray is loosely attached and not connected to it. So once you pick up the dock, it will likely fall off. Still, this makes the tray easier to clean.

Set Up And App
To start using your bot, the first thing you need to do is to plug its charging station and attach its drip tray. After this download the iRobot Home app, which is available for both iOS and Android.
Here are the steps you need to do after downloading:
- Create an account.
- Navigate the menu and select Braava Jet.
- Enter the password of your Wi-Fi connection.
- Press and hold the Braava Jet M6’s Home and Spot buttons simultaneously.
- Once you hear a beep, choose the model of your robot from its menu.
- Wait for your M6 to connect to your local network. Once connected, your setup is complete.
iRobot Home is intuitive and user-friendly. On its main screen, you’ll see a massive Clean button that enables you to start and stop your robot from cleaning. Above it, you’ll find which cleaning mode your unit is in, as well as its battery level indication. Meanwhile, the bottom of the screen holds the Smart Maps, Settings, History, Schedule, and Help tabs.
The Braava Jet M6 will take a few rounds to learn your home’s layout, which you can see in the Smart Maps tab. Afterward, you have an option to label certain rooms where you want your robot to clean. If you want to view the cleaning sessions of your smart gadget, simply access History.
Meanwhile, you can learn things like warranty information, maintenance, owner’s guide, and more in the Help tab. Go to Settings if you want to change language, locate your unit, change Wi-Fi details, or do a factory reset.
Another great feature of the M6 is voice control. That means you can connect it to Google Assistant or Amazon’s Alexa. When connected, you’ll be able to assign voice commands via your smartphone to tell it to start, pause, stop, and return to its dock.

Performance
To begin a cleaning session, simply attach one of your cleaning pads into the pad reader of the Braava Jet M6 and then press clean. This robot mop can navigate around obstacles and corners gracefully and without hangups. Also, one of the things you’ll like about it is how it can recognize carpeting right off the bat. Hence, you don’t need to physically or virtually set up barriers.
Once your bot is done sweeping your floors, you can remove the grimy pad with a single push of the eject button. To mop, insert the wet mopping pad. Then, remove the water tank and fill it with tap water. You may also use the cleaning solution. Just make sure to read the recommended water to solution ratio on the owner’s manual. Afterward, return it to the compartment and press the clean button.
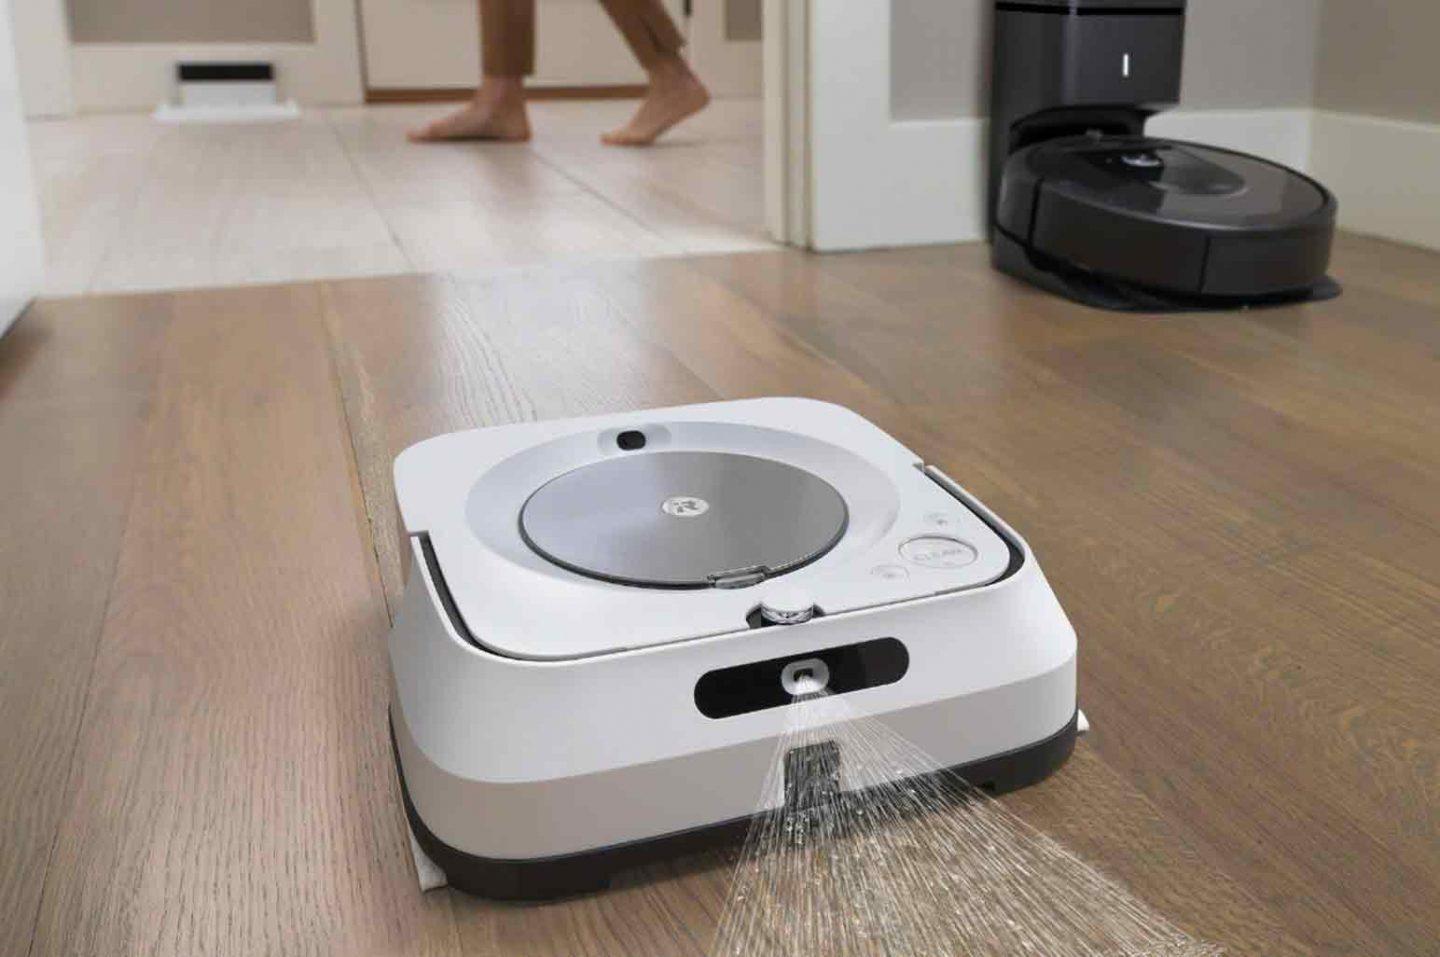
During mopping mode, the M6 will spray a stream of water about a few inches in front of it. It will then go back and forth a couple of times across that area. This little cleaning machine does an excellent job at navigating and mopping, which is evident in the amount of filth you’ll see on its mopping pad.
Furthermore, it allows you to customize wet mopping to your preference in the Settings menu of the iRobot Home app, these include:
- Standard mode. This mode balances the total area the robot can cover and its cleaning power.
- Deep mode. In this mode, the power of the M6 is increased while reducing the area it can clean to manage tough messes.
- Extended coverage mode. When you’re in this mode, your robot has less cleaning power but will be able to mop large areas much faster.
For larger homes or if your floor plan is complex, you can use the mapping feature of the Braava Jet M6 to direct it to specific rooms. Likewise, you can use it to set virtual barriers, giving you more control over its cleaning tasks. Once the mapping feature is activated in the app, it will only take the robot a few passes to create a map of your home.

Final Verdict
The Braava Jet M6 is one of the smartest robot mops you can invest in. It boasts outstanding navigation, offers cleaning modes that you can customize, and is packed with smart features. If you have a large home or your flooring is mainly hardwood or tiles, this may very well be a better purchase in comparison to a vacuum. But if you live in a condo or a home with restricted space, then you may want to opt for a smaller option that costs less.

